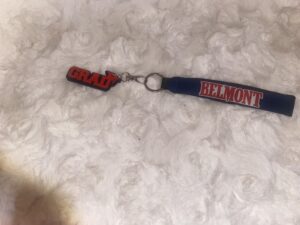
Hello Divine Crafters. Welcome back in this blog post I’m going to give you the instructions on how I created this two lay grad keychain and wristlet. Make sure to check the video instructions over on the Divine Creations by Erica Facebook Page.
What Material Do You Need?
Two Layer Grad Keychain (I purchased mine from Blessed to Create Blanks)
Wristlet (I purchased mine from Blessed to Create Blanks)
Sublimation Printer
Sublimation Paper
Heat tape
Parchment or butcher paper
Heat Press that can reach 400 degrees
Program to make your design. (I use Canva.com)
Creating Your Design.
You want to always make sure that you are measuring your items. Even if you by the items in bulk make sure that you get your own measurements. For this project I will be leaving a little more room as I like to have a little extra space just in case an item moves when being shifted to the heat press. Set your heat press for 400 degrees and we will press each item for 60 second each. Here are the measurements I used to create this design.

Keychain bottom layer which is the blue part on the picture.
Width: is 2.4 inches
Height is 1.4 inches.
Keychain top layer which is the red part on the picture.
Width is 2.3 inches
Height is 1 inch.
The measurements for the wristlet is as follows:
Width is 5.5 inches
Height is 1 inch.
You are going to want to make sure you duplicate the design for your wristlet as it is front and back or you can create a design for each side.
Lets get started on the crafting.
We are going to start with the bottom layer you are going to want to find a design that you like and make it to the size of the measurements. For this project I just created a blue box in the color that I wanted. You can be creative here and add any colors or pictures that you would like. You are going to get the bottom piece to your keychain which is a completely solid piece. Make sure you pull off the protective clear film before pressing your design. You are going to repeat the same steps with the correct measurement for the top piece. When pealing the protective film for top layer make sure that you are not removing the side with the adhesive backing.
For the wristlet you are going to complete the same steps as you did with the top and bottom layer. However, for this design I decided to add text. To add text I took my square book and typed in the text I wanted to add. I then centered the text within the box that I had made. You want to make sure that your text is not longer or taller than your box. If it is you will need to size it down to make sure that it will all fit onto your wristlet.
THIS IS A MAJOR STEP IN PRITING SUBMLIMATION. YOU WANT TO MAKE SURE THAT YOUR DESGIN IS MIRRORED WHEN YOU PRINT.
Once you have printed your design cut out each of your boxes. With this project you should have printed four different boxes. One of the top layer, one for the bottom layer and two for the wristlet one for each side.
Cut out each one of your images once you have them cut out tape down your pieces to the matching boxes. You are going to want to press the wristlet separate from the key chain. The reason is due to the pressure and height difference that it will create on your heat press.
Now that you have everything taped down place a piece of butcher paper or parchment paper down on your heat press. You are going to place your item on the heat press with the paper facing up. Cover the project with another piece of parchment or butcher paper. Press for 60 seconds. Once the time is up remove the item from the heat press and repeat the same steps for your wristlet. Once everything is pressed and cooled down remove the tape and paper from your project. Take the adhesive backing off the top piece and place it onto the bottom piece. Press down but not to hard so that you don’t break the top piece.
You are all down and have created a two layer key chain and wristlet.
Keep Crafting Family.
Leave me a comment and tell me what you think of this blog. Your information and feedback is always helpful.
If you haven’t already leave join our mailing list and leave us some project ideas, so, you can stay up to date on what is happening next at Divine Creations by Erica.
Follow me on Facebook